7. The Succubus Civil War [second half] - Loekyusa
Main Scenario Walkthrough
Honey Village Guide
The Succubus Civil War
Entering the northernmost land, the Norden region, you find the Succubus tribe locked in conflict. It seems an internal struggle has broken out among the tribe, with Feminel also somehow involved…!?
5. Proceed to the northern residential area, deeper into the town
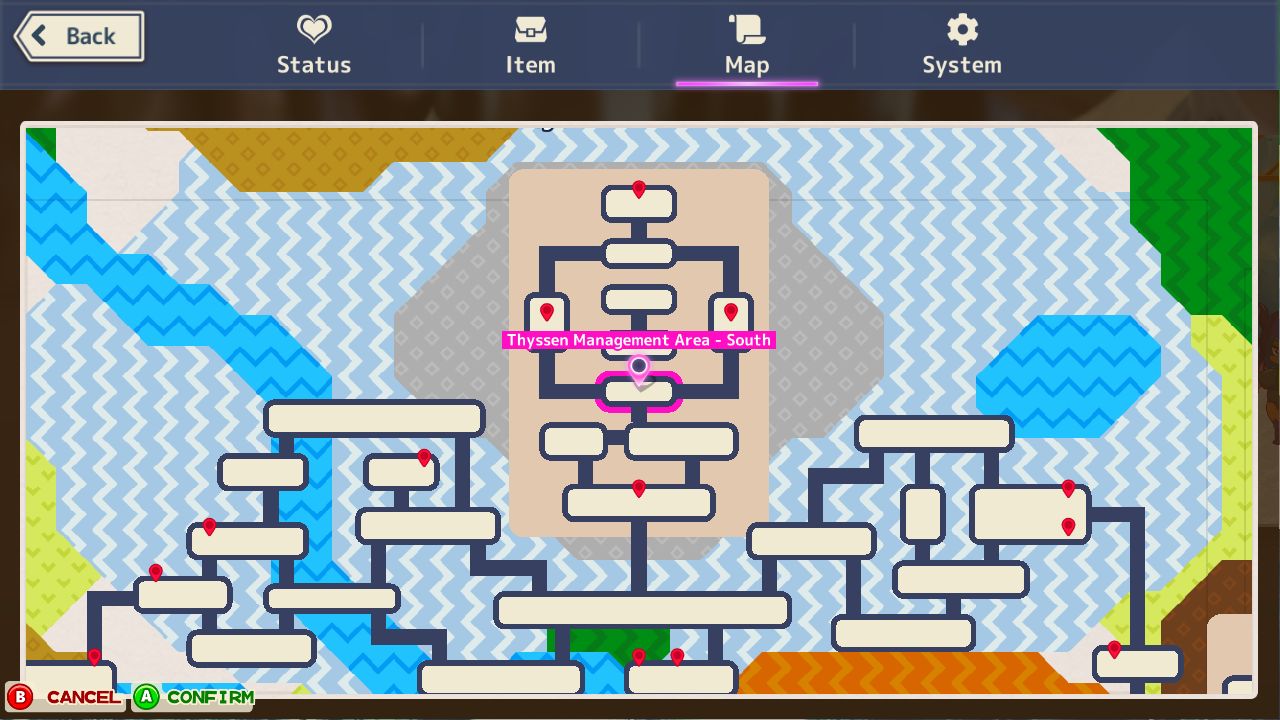
As you attempt to enter the “Tyusen Administration Zone - South” from the southeast of the Residential Area, a conversation event near Fail will trigger.
Enter “Tyusen Administration Zone - South” and after the conversation with Fail, head west first.
6-1. Reclaim the western building (Magical Amplification Base)
Enter the “Magical Amplification Base” located in the “Tyusen Administration Zone - West.”
A Myconid appears under a visual effect, making it invulnerable to damage.
In this guide, this invulnerable state is referred to as “Barrier State.”
Attacking the Barrier State Myconid will trigger a conversation event. Follow Fail to the B1 floor.
Attack the wall object in the narrow corridor to let in two Barrier State Myconids.
Avoid approaching Fail and destroy the wall object to proceed toward the magical device.
Destroy the magical device deep within to remove the Myconids’ Barrier State, then defeat the two Myconids that Fail was holding off.
The three Myconids in the narrow corridor don’t need to be defeated to proceed.
Return to the 1F Entrance and enter “Room B” through the door beyond the broken left wall.
Defeat 2 Myconids to unlock the door, and obtain the “Detention Control Base Key” from the treasure chest.
The wall with a lightning mark on the far left of the entrance can be destroyed with the Thunder Sword.
Don’t forget to re-equip your original weapon after using the Thunder Sword.
Enter “Room C” and defeat 2 Myconids to unlock the door.
Treasure chest contains a “Strong Healing Potion” and “Mithril Ore.”
In “Room A” at the far right of the entrance, if you previously chose “Talk to her” for the timid orc Tina in Pomieroad, an event will occur. This event is unrelated to the main quest.
[For details on the Tina’s Home Invitation Event, click here.]
Go back to B1 and open the door connecting to “Underground Passage - B1.”
Proceed onward to reach “Detention Control Base - B1.”
Inspect the pedestal, use the key to unlock the door, then enter the “Side Room.”
Defeat 3 orcs; one will drop an “Orange Magic Stone”—make sure to pick it up.
Items may overlap with objects or fallen characters and be hard to see. If your character says, “I should pick up the ore,” then the item has definitely dropped—search thoroughly even if you don’t see it.
Interact with the switch to unlock two prison cells in “Detention Control Base - B1.”
You cannot activate the switch without first defeating the 3 orcs in the Side Room.
Interact with the prison doors to open them and speak to the characters inside to rescue them.
You can attack them, but this doesn’t affect story progression. However, make sure to rescue everyone.
If you attacked someone and can no longer talk to them, leave and re-enter the room to enable interaction again.
After rescuing both characters, leave the building.
6-2. Reclaim the eastern building (Magical Transmission Base)
Enter the “Magical Transmission Base” to the east.
Proceed to “B1 Supply Room” and enter the “Communication Room” where you'll encounter non-hostile Rebellion soldiers. Approach to trigger a conversation.
Return to 1F Entrance and go up to the “2F Control Room.”
Operate the nearby switch, and after the conversation, speak to Fail to receive the “Fail’s Whistle.”
Proceed deeper and use the whistle from your item menu near the locked door.
Continue forward and use the whistle again to operate the switch that opens the B1 door.
Use the same method to return to the entrance.
On B1, go to the far-left room and destroy the magical device there.
While you’re at it, don’t forget to pick up the “Strong Healing Potion” from the treasure chest in the B1 Storage Room.
Return to the entrance, head through the door on the left to the hallway, and enter “Room A.”
In Room A, the “Magical Transmission Base Key” is hidden inside a pot on the left. Smash all the pots on the left to find it.
Proceed and enter the “Conference Room,” where the Rebellion soldier “Franka” will turn hostile. Defeat her.
She will flee to “Room D” in the back left of the Conference Room. Follow her.
Two more Rebellion soldiers will appear as reinforcements, making it a 3v1 battle. Defeat all.
Carry Franka to the Communication Room on B1 and speak to Kathrin.
Afterward, proceed through the underground passage she unlocks.
On “Underground Passage - B2,” defeat a goblin wearing a talking mask; then an event occurs where Franka, now captured, is being attacked by the goblin.
Continue through the passage to reach “Detention Control Base - B2.”
Enter the “Side Room” and defeat 2 orcs, then activate the switch.
Open the prison doors and rescue the characters inside to receive a “Purple Magic Stone.”
Make sure to rescue both prisoners.
Return through the path to B1 Supply Room in the Magical Transmission Base, watch the conversation with Fail, then exit the building.
6-3. Reclaim the northern building (Magical Diffusion Base)
After exiting the building, head north to "Tyusen Administration Zone - Central" to trigger an event where Fail is captured.
Proceed to the "Detention Center" and descend to "Detention Control Base - B3."
After the conversation event, enter the "Side Room" and approach the Rebellion soldier to trigger an event and receive the "Magical Diffusion Base Latch Key."
The Rebellion soldier Petronella can be spoken to again to trigger a lewd event.
Exit the building and head north to enter the "Magical Diffusion Base."
Inspect the pedestal at the front and use the "Magical Diffusion Base Latch Key" to unlock the door.
Proceed through the opened door on the right into the hallway, then enter the "Storage Room" on the left.
Move toward the visible switch to fall down into the entrance, and destroy the magical device there.
Check the cage door to open it, then return to the hallway through the left side and proceed to the "East Hall."
Enter the "Guardroom" to find the Rebellion soldier Ursula and two goblins—defeat all enemies.
If you enter this room before destroying the magical device, investigate the glowing area to exit.
Carry Ursula and check the control room door to the left.
Return to the guardroom and attack an elf, carry them, and check the control room door again.
Inside, battle Rebellion soldier Saskia, two Imps, one Myconid, and one Slime—5 enemies total.
Enter the "1F Storage" room next to Vivi and Sissi.
Operate the switch to unlock the "1F Communication Gate."
Return to the entrance from either direction.
Enter the "West Hall" from the entrance to trigger an event.
The event won’t trigger if entering from the "2F Preparation Room" side—be careful.
Chase the beastkin into the "2F Preparation Room," and further into "3F Room A" to fight two Imps.
After defeating the Imps, the beastkin parent and child will reunite.
The door to "3F Corridor" from "2F West Hall" requires authentication.
Bring Saskia from the east control room and examine the door.
Then bring one of the beastkin and examine the door again to proceed.
From the left treasure chest in "3F Corridor," obtain "Mithril Ore." The right chest is a trap—opening it will...!?
Random characters of various races may be seen being chased by goblins—remember, they can be used for authentication.
The east authentication door requires Succubus and Elf. The west door requires Succubus and Beastfolk.
6-4. Help Fail
Return to the entrance and enter the "1F Communication Gate," go through the underground passage to reach "Detention Control Base - B3."
Enter the "Side Room," defeat three orcs, and operate the switch.
Rescue the captured Bardra and Fail from the prison.
Retrace your path and exit the building.
6-5. Gather three magic stones
Enter the Detention Center one area south to trigger an event.
If no event triggers, you likely missed rescuing some prisoners. You need to have rescued six characters including Fail.
Enter the "Break Room" where Elf "Rosamond" fled to fight one Orc, one Myconid, and one Slime—three enemies total.
Defeat them to obtain the "Green Magic Stone."
7. Give the magic stones to Feil
Return to "Tyusen Administration Zone - South" and speak to Fail.
7. Storm the northern Residential Area
This will trigger a boss battle—prepare your equipment and healing items thoroughly beforehand.
Inspect the large door to enter "Roekyusa Residential Area - North."
Battle eight enemies: 2 Rebellion soldiers, 2 Imps, 2 Orcs, 1 Myconid, and 1 Orc.
Use ally support to divide aggro and defeat each enemy one by one.
After defeating them all, four enemies including Bente enter Barrier State and Fail collapses.
Enter the adjacent building left of the red door, the "Library," and quickly head to the 2nd floor.
Destroy the magical device at the back of the 2nd floor.
You may leave without defeating enemies on the 1st or 2nd floor.
Defeat the four enemies with Agnes to clear the main quest "The Succubus Civil War."
Agnes is a powerful NPC—if you're in danger, rely on her and distance yourself.
However, don’t rely too much—Agnes can be overwhelmed when facing 4 enemies alone. Be cautious.